Demystifying the math and implementation of Convolutions: Part II.
Part 2 of the series, we will discuss how to improve the performance of our convolution implementation using vectorization and matrix multiplication.
Introduction
So, in the previous part of this series, we have implemented Convolutions in Python and have gained deeper understanding of what exactly a convolution is. In this part, we will discuss how to improve such techniques and represent it in terms of matrix multiplication.
Improving the performance through Vectorization
So far so good! Maybe not, since the previous implementation is so naive. We would better reduce those for loops into vectorized code, but it is a bit tricky. When it comes to vectorized code, developers usually seeks to use BLAS-like operations such as GEMM (GEneral Matrix Multiplication). These routines are optimized for speed and provided by various manufacturers such as the generic opensource OpenBLAS, Intel CPU optimized MKL (Math Kernel Libraries). Since we are coding in python (mean while, I am yet to implement this is C) numpy takes care of this for us, as long as we avoid for loops. So let’s get started.
Turning Convolution Intro Matrix Multiplication im2col
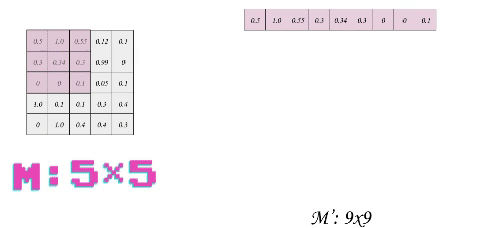
The idea behind optimizing convolution is to transform each patch (or sub-matrix) into a flattened row in a new Matrix. This process is called im2col. If we use a stride of 1, we will have to slide the filter 16 times over the matrix m, thus the output shape of im2col is 169 where 9 is the total size of filter 33 and 16 is the number of patches. Another way to figure it out is to calculate the convolution output shape, which was 44 = 16. But let us take a smaller example of size 55 to reduce dimensions and thus the complexity of the process.
The first thing that probably would come to your mind is the huge data redundancy. Each optimization comes at the cost of something and in our case, we are losing some free space. Here, we prioritize the speed of execution over the memory. Although in a real application, this would be executed on the GPU which might have more memory constraints but is actually favorable as memory access in matrix multiplication can be optimized for an uncoalesced access, but that is a story of another day.
What we want to do next is to transform the filter into a single matrix row (called Flattening), from k = 33 to k = 91 (row vector). We will see the advantage of this operation soon. But first , here is the process:

Now let’s visualize the convolution operation as matrix multiplication:

The result is a 91 Matrix, but recall that for this example our original Matrix has a shape of 55 so when performing the convolution with a filter 33 and a stride of 1 across both rows and cols, we obtain an output of shape 33 (Use the previous formula to verify the output shape), and we can reconstruct the output original matrix by reshaping the matrix.
Now before we get into code, let me remind you that in real CNN, convolutions tend to go over volumes (which will be discussed later) and an increasing number of filter over the same input. So, this is extremely easy to model using our new convolution approach. Each filter is simple a new Column of the new K, thus the number of columns in the matrix K is the number of filters you would like to apply. And notice how the output shape has exactly the same columns of the filters.

Vectorized Implementation
Now that we have the theoretical aspects of vectorization clear (hopefully), let’s do some code. We first define our im2col method which will transform an image into the desired transformed matrix. Then, we simply perform multiplication over the set of filters, flattened into a col matrix.
Since im2col is a bit tricky, it is very fortunate that it is already implemented in sk-image. Here the API documentation: https://scikit-image.org/docs/dev/api/skimage.util.html#skimage.util.view_as_windows.
To be fair however, coding it is a bit tricky and chose to avoid it for this article as it is deep enough already
Words mean nothing, show me the stats!
You got it. Below is a speed comparison of the previous convolution operation from the first part, compared to the new code in terms of execution time! Before sharing the stats, the if you clone and run the notebook yourself, you may not get the same results, I have tested them on Macbook Pro i5 laptop, it would be great if you can share your results! I might upload them here as well.
Performing Convolution on N filters
So far, we have seen convolutions on a single filter. With im2col matrix, we can compute N filters much faster than the original for-loop version. Since we have already discussed the theory, let me just share the code with you.
End of the II-end part
So here comes the end of the second part of this series, hope it was informative and are you able to rewrite and hack the code, as we need more low level deep learning hackers to create new innovative tools and techniques.
Articles written in this blog are my own opinions and do not reflect the views of my employer. Content on this website is original unless mentioned otherwise. Original content is licensed under a CC BY 4.0 Deed. Some of the content might have been preprocessed by AI for clarity and articulation.